
这是一个创建于 1929 天前的主题,其中的信息可能已经有所发展或是发生改变。
前言
在上一篇文章中,我们对游戏主体的逻辑进行了完善,通过一个 GameManager 配置了游戏的关卡,并一同完成了游戏的判赢和判输逻辑。
现在,我们先来完成游戏的计时器。
计时器
计时器的目的是为了记录当前玩家进行游戏时所耗费的时间,给玩家营造出一种「紧张」的氛围,增加游戏乐趣。
在 Swift 中实现计时器相对 OC 会简单一些,主要是相关 API 方法的简化。在具体实现之前,我们的需要明确几个问题:
- 创建好游戏后,开始计时;
- 游戏结束后(赢或输),结束计时;
- 点击「继续摸鱼」后,重置计时器,并重复第一步。
Swift 中的实现计时器有两种方法,一是直接使用 Timer 但很有可能会因为当前 RunLoop 中有一些其它操作导致计时不准,另外一种是使用 GCD,效果要比 Timer 的好,但使用起来略有不适。考虑到我们的这个小游戏整体逻辑并不复杂,并不会在主线程的 RunLoop 中做一些什么多余的操作,因此直接使用 Timer 即可。
稍微从整体架构出发思考一下,我们已经通过了一个 gameManager 去管理了整个游戏的逻辑,并且准备加入 Timer 做计时器的管理,我们需要创建一个变量去统一计算出当前游戏所耗时多少,而不是直接把 Timer 传递出去给 SwiftUI,
class GameManager: ObservableObject {
    /// 对外发布的格式化计时器字符串
    @Published var timeString = "00:00"

    // ...

    /// 游戏计时器
    private var timer: Timer?
    /// 游戏持续时间
    private var durations = 0

    // ...
}
(如果你已经了解了什么是计时器,这段直接跳过)创建出一个计时器,并不是说直接就可以拿到「计时」的时间值了,而是说给了你一个「间隔」一定时间的回调,至于每次这个「间隔」到了,回调这个方法,这个方法里做什么,才是我们去定义的。因此,需要使用 durations 去记录当每次「间隔」到了以后,在回调方法里进行加一操作。
// ...

// MARK: - Init

/// 便捷构造方法
/// - Parameters:
///   - size: 游戏布局尺寸,默认值 5x5
///   - lightSequence: 亮灯序列,默认全灭
convenience init(size: Int = 5,
                    lightSequence: [Int] = [Int]()) {

    // ...

    timer = Timer.scheduledTimer(withTimeInterval: 1, repeats: true, block: { timer in
        self.durations += 1

        let min = self.durations >= 60 ? self.durations / 60 : 0
        let seconds = self.durations - min * 60


        let minString = min >= 10 ? "\(min)" : "0\(min)"
        let secondString = self.durations - min * 60 >= 10 ? "\(seconds)" : "0\(seconds)"
        self.timeString = minString + ":" + secondString
    })
}

// ...
我们在初始化方法中把 timer 变量给实例化了,并在 block 中补充了「计时」逻辑。对于一个简单的计时器来说,实际上只需要实现 self.durations += 1 这行代码就完事了,用 @Publisher 关键词修饰这个变量,在 SwiftUI 中展示出来就稳妥了。但是这样的计时器是直接从 0 递增的,与我们常规看到的计时器不一样,需要使用字符串格式化为「 00:04 」这样的方式。所以,我们最终暴露给 SwiftUI 使用的是一个字符串变量。
在 SwiftUI 中修改的代码为:
import SwiftUI

struct ContentView: View {
    @ObservedObject var gameManager = GameManager(size: 5, lightSequence: [1, 2, 3])

    var body: some View {
        VStack(alignment: .leading) {
            Text("\(gameManager.timeString)")
                .font(.system(size: 45))

            ForEach(0..<gameManager.lights.count) { row in
                HStack(spacing: 20) {
                    ForEach(0..<self.gameManager.lights[row].count) { column in
                        Circle()
                            .foregroundColor(self.gameManager.lights[row][column].status ? .yellow : .gray)
                            .opacity(self.gameManager.lights[row][column].status ? 0.8 : 0.5)
                            .frame(width: self.gameManager.circleWidth(),
                                   height: self.gameManager.circleWidth())
                            .shadow(color: .yellow, radius: self.gameManager.lights[row][column].status ? 10 : 0)
                            .onTapGesture {
                                self.gameManager.updateLightStatus(column: column, row: row)
                        }
                    }
                }
                    .padding(EdgeInsets(top: 0, leading: 0, bottom: 20, trailing: 0))
            }
                .alert(isPresented: $gameManager.isWin) {
                    Alert(title: Text("黑灯瞎火,摸鱼成功!"),
                          dismissButton: .default(Text("继续摸鱼"),
                                                  action: {
                                                    self.gameManager.start([3, 2, 1])
                          }
                        )
                    )
                }
        }
    }
}
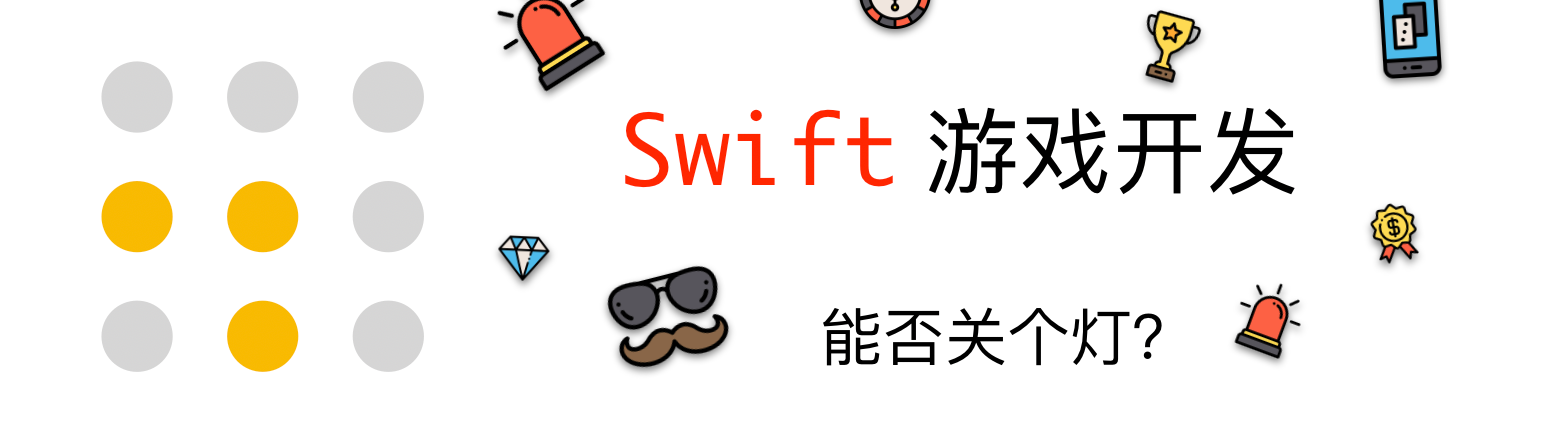
注意,我们已经给 ContentView 最外层添加上了一个 VStack 用于排布计时器和游戏主体布局。运行工程,我们的计时器已经跑起来啦~
但是游戏结束后,计时器居然还在跑!思考一下,我们确实只开了计时器,并未结束计时。在 GameManager 中新增两个方法用于控制计时器的销毁和重置。
// ...

func timerStop() {
    timer?.invalidate()
    timer = nil
}

func timerRestart() {
    self.durations = 0
    self.timeString = "00:00"

    timer = Timer.scheduledTimer(withTimeInterval: 1, repeats: true, block: { timer in
        self.durations += 1

        // 格式化字符串
        let min = self.durations >= 60 ? self.durations / 60 : 0
        let seconds = self.durations - min * 60


        let minString = min >= 10 ? "\(min)" : "0\(min)"
        let secondString = self.durations - min * 60 >= 10 ? "\(seconds)" : "0\(seconds)"
        self.timeString = minString + ":" + secondString
    })
}

// ...
在 GameManager 中的「判赢」方法补充完相关逻辑:
// ...

/// 判赢
private func updateGameStatus() {
    guard let size = size else { return }

    var lightingCount = 0


    for lightArr in lights {
        for light in lightArr {
            if light.status { lightingCount += 1 }
        }
    }

    if lightingCount == size * size {
        currentStatus = .lose
        // 新增
        timerStop()
        return
    }

    if lightingCount == 0 {
        currentStatus = .win
        // 新增
        timerStop()
        return
    }
}

// ...
再到 ContentView 中弹出 Alert 的地方补充计时器重置逻辑:
// ...

.alert(isPresented: $gameManager.isWin) {
    Alert(title: Text("黑灯瞎火,摸鱼成功!"),
            dismissButton: .default(Text("继续摸鱼"), action: {
                self.gameManager.start([3, 2, 1])
                self.gameManager.timerRestart()
            }
        )
    )
}

// ...
运行工程,赢得比赛,重新运行!计时器部分已经完成啦!
操作记录
只是记录了此次游戏的经过时间,貌似还不够刺激,我们可以再给游戏加上「步数统计」,用于记录每个玩家的每盘游戏都经历了多少步才完成游戏。
给 GameManager 添加上 clickTimes 变量:
class GameManager: ObservableObject {
    // ...

    /// 点击次数
    @Published var clickTimes = 0

    // ...
}
点击次数依赖于 ContentView 的 onTapGesture 事件的触发,
// ...

ForEach(0..<gameManager.lights.count) { row in
    HStack(spacing: 20) {
        ForEach(0..<self.gameManager.lights[row].count) { column in
            Circle()
                .foregroundColor(self.gameManager.lights[row][column].status ? .yellow : .gray)
                .opacity(self.gameManager.lights[row][column].status ? 0.8 : 0.5)
                .frame(width: self.gameManager.circleWidth(),
                        height: self.gameManager.circleWidth())
                .shadow(color: .yellow, radius: self.gameManager.lights[row][column].status ? 10 : 0)
                .onTapGesture {
                    self.gameManager.updateLightStatus(column: column, row: row)
                    self.gameManager.clickTimes += 1
            }
        }
    }
        .padding(EdgeInsets(top: 0, leading: 0, bottom: 20, trailing: 0))
}

// ...
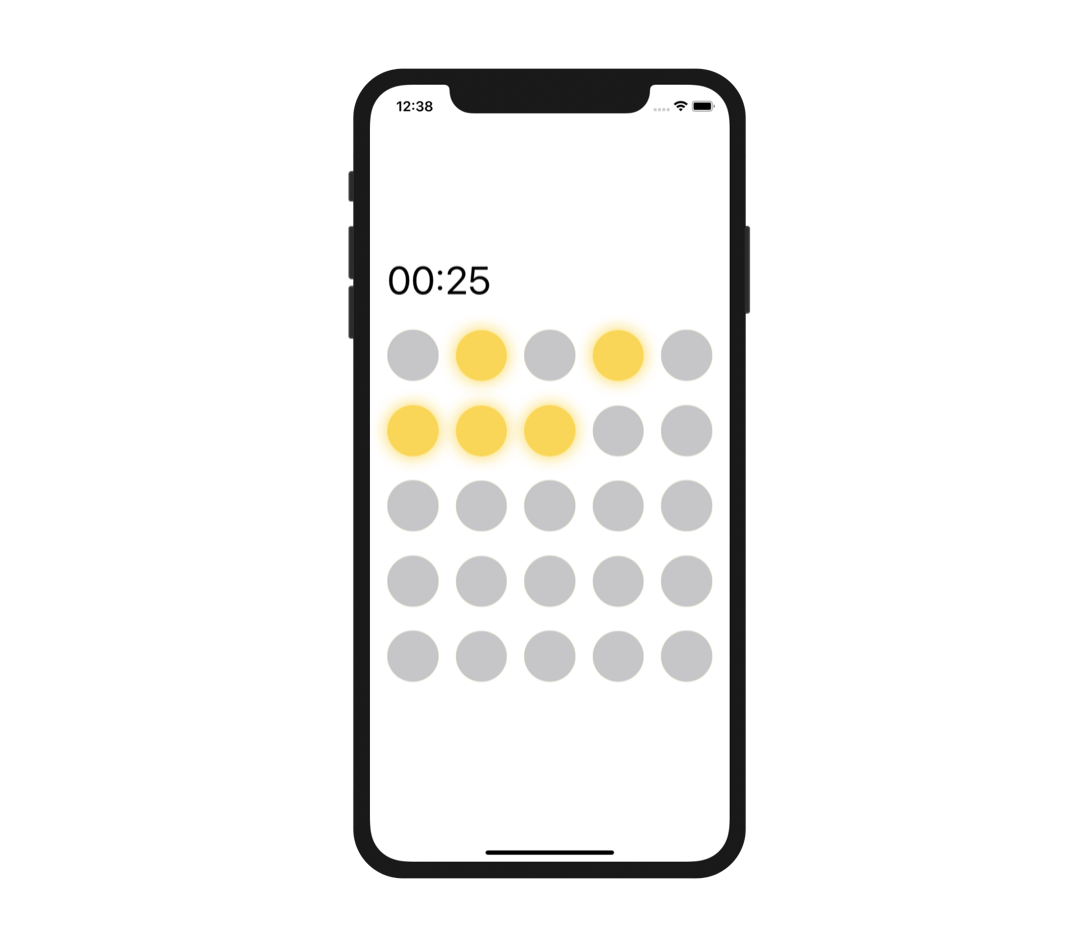
修改「步数统计」和「计时统计」在同一个父容器中,修改相关的逻辑:
struct ContentView: View {
    @ObservedObject var gameManager = GameManager(size: 5, lightSequence: [1, 2, 3])

    var body: some View {
        VStack {
            HStack {
                Text("\(gameManager.timeString)")
                    .font(.system(size: 45))


                Spacer()

                Text("\(gameManager.clickTimes)步")
                    .font(.system(size: 45))

            }
                .padding(20)

            // ...
        }
    }
}
运行工程!「步数统计」已经可以玩啦~
历史记录
注意:这部分功能并不会在项目中体现出来,只在文章中做讲解。
历史记录这个功能有助于玩家回顾自己的游戏历程,比如在何年何月何日历经了多长时间完成了游戏。换句话来说,这种 case 在实际运营过程中是有利于用户留存的,同样,「排行榜」的作用也是如此。
想要实现历史记录的功能,主要有本地和远端记录的两种模式,如果是在实际开发过程中,主要是通过服务器去做「历史记录」的数据保存,但在这个小游戏中,先通过本地保存一份历史记录的数据,再后续的后端开发缓环节中我们再一起探讨。
在 iOS 中实现本地存储的方法总的来说就是写文件,只不过这个文件的种类不一样而已。因为游戏的数据比较简单:
- 游戏结束时间;
- 总耗时;
- 是否完成;
- 点击了几步。
我们采取的「序列化」历史记录数据,首先需要创建出现需要序列化的模型:
struct History: Codable {
    /// 游戏创建时间
    let createTime: Date
    /// 游戏持续时间
    let durations: Int
    /// 游戏状态
    let isWin: Bool
    /// 游戏进行步数
    let clickTimes: Int
}
并在 gameManager 中新增一个保存方法 save():
// ...

private func save() {
    let documentUrl = FileManager.default.urls(for: .documentDirectory, in: .userDomainMask).last!
    let historyUrl = documentUrl.appendingPathComponent("gameHistory.plist")

    let history = History(createTime: Date(), durations: durations, isWin: isWin, clickTimes: clickTimes)

    var gameHistorys = NSArray(contentsOf: historyUrl)
    if gameHistorys == nil {
        gameHistorys = [History]() as NSArray
    }
    gameHistorys?.adding(history)

    gameHistorys!.write(to: historyUrl, atomically: true)
}

// ...
当每次游戏结束后,直接调用该方法即可把当前游戏保存到磁盘中。在这里我们把 Array 转为 NSArray 是因为 Array 没有 write(to: URL, atomically: Bool) 这个方法供我们使用,转换一下即可。
同样,我们可以在 ContentView 中添加一个 Button,通过 sheet 方法跳转到「历史页面」中:
struct ContentView: View {
    @ObservedObject var gameManager = GameManager(size: 5, lightSequence: [1, 2, 3])

    @State var isShowHistory = false

    var body: some View {
        VStack {
            // ...

            HStack {
                Spacer()

                Button(action: {
                    self.isShowHistory.toggle()
                }, label: {
                    Image(systemName: "clock")
                        .imageScale(.large)
                        .foregroundColor(.primary)
                })
                    .frame(width: 25, height: 25)
            }
                .padding(20)
        }
            .sheet(isPresented: $isShowHistory, content: {
                HistoryView()
            })

            // ...
        }
    }
}
通过一个 isShowHistory 的变量去控制 HistoryView 的出现,运行工程:
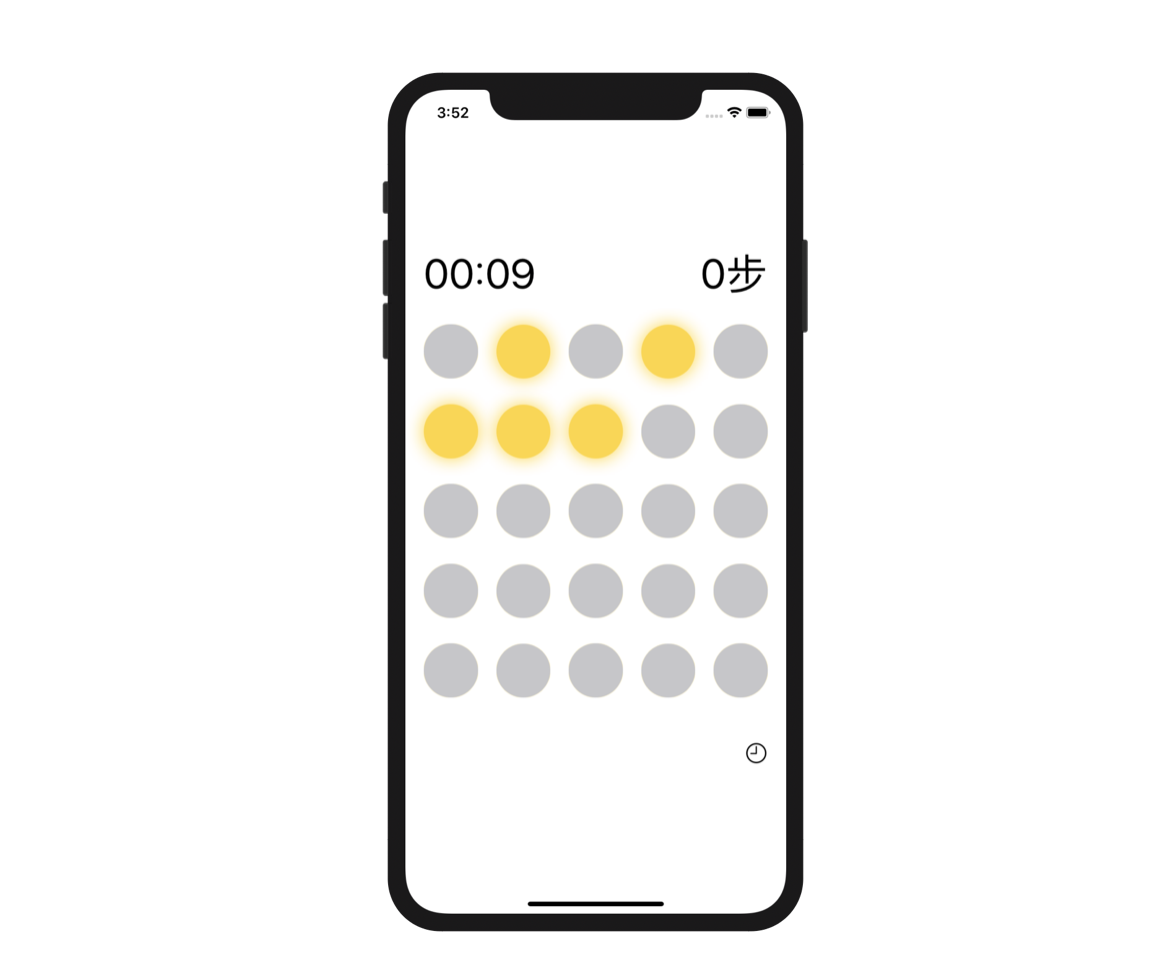
关于 clock 这个图标,使用的是 SF Symbols,你可以在这个网站中进行下载。
至于 HistoryView 中的页面大家就自己去写啦~相信经过这几篇文章的讲解,你对 SwiftUI 也有了自己的一些感悟,快动手去尝试写一个属于自己的 SwiftUI 页面吧~。
后记
在这篇文章中,我们已经把这个小游戏的所有逻辑都完成了。但是我们现在只有单一关卡,如果你想成「闯关」模式,只需要再构建一个二维列表去承载亮灯序列,在每把游戏结束后通过一个递增的索引去获取二维列表中的亮灯序列就可以啦~
现在,我们的需求已经完成了:
- [x] 灯状态的互斥
- [x] 灯的随机过程
- [x] 游戏关卡难度配置
- [x] 计时器
- [x] 历史记录
- [ ] UI 美化(留给大家按照自己喜欢的样式去修改吧~)
GitHub 地址:https://github.com/windstormeye/SwiftGame
来源:我的小专栏《 Swift 游戏开发》:https://xiaozhuanlan.com/pjhubs-swift-game
 |
1
cwjokaka 2019-09-14 13:45:48 +08:00
支持~值得参考
|