人在网上“爬”,哪有不挨“刀”。
反爬的首选第一件事就是封 IP,爬虫选手第一件事就是上代理。
So...
一直代理 IP 资源都是紧俏资源,甚至花钱都不一定买得到好的。
于是有些需求就有了,IP 代理系统是不是也可以搞一个?
当然,这样的需求早就有解决方案了。
一键启动 XX 代理,一键使用 XX 云申请 100 台主机启动代理...
这类方案差不多应有尽有了。
然而此类的方案问题在于,代理 IP 绑定在服务器上的,
流量出口总是很容易被查到是 XX 云厂商等等的。
那么,如果我们用手机客户端( Android ) + 4G 作为流量出口呢?
So...
Echo 4G 代理系统应运而生。
项目地址: https://github.com/virjar/echo
是我的老熟人 https://github.com/virjar(渣总) 开源,
PS: 最近我边用边维护,修修 Bug
Echo
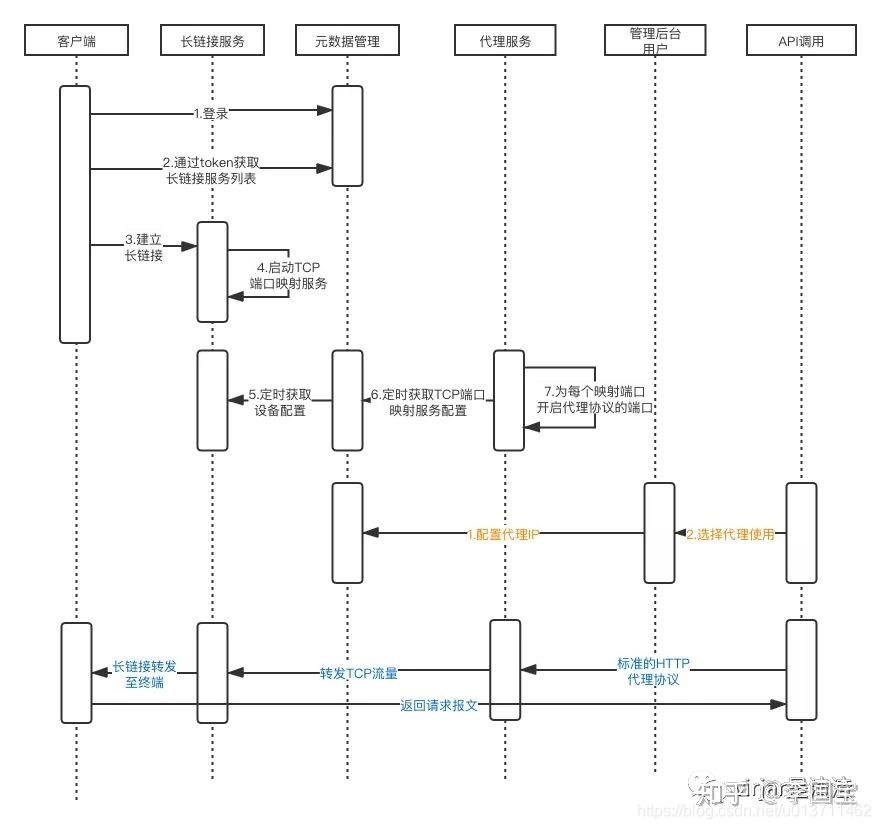
Echo 是一个分布式的代理共享和管理系统,以长链接的方式连接多个运行在任意位置的终端,并将终端的网络资源整理为一套代理 ip 集群系统。
echo 提供整体的鉴权、流量监控、quota 控制的功能。
- Echo 天然支持复杂网络环境,所以可以将代理终端部署在手机(甚至树莓派等终端设备)
- Echo 支持代理 ip 统一的集群管理,所以可以作为 ADSL 拨号的服务资源的的统一管理出口。使用 ADSl 使用统一的,稳定的 ip 出口提供代理服务(而不需要沉重的 redis 负担)
- Echo 支持 sdk,目前提供完善的 android APK 和 gradle 依赖(这个作用你懂的 )
- Echo 分布式设计,天然集群版,无资源瓶颈上限。各节点自动双通道 HA 热备,无单点风险。
- Echo 全程 NIO 设计,对资源消耗少,支持并发高(所以代码难度大,可以买个好价钱),理论上代理最大吞吐占满节点带宽。
- Echo 系统扩展能力强,原则是 echo 的底层设计使得 echo 支持任意网络协议转发( udp 、tcp 、vpn 等),且任意协议支持不需要终端升级
- 终端命令控制,你可以通过 http 接口将特定指令下发到对应终端.实现如 shell 执行、ip 重播等需求。

PS:请 java 高级工程师以下(初级和中级)同学不要尝试 Echo 服务端的研究 ,请 java 初级(包括不会 java 语言的同学)不要尝试部署 Echo 服务端。(渣总原话
嗯?被劝退了?有宝哥在啊。
虽然系统部署比较复杂,不过我们有 docker-compose 神器啊。
部署服务端
部署方法一:
git clone https://github.com/virjar/echo/; cd echo; docker-compose up -d;
部署方法二:
新建一个文件夹 echo-deploy,新建 docker-compose.yaml,填入下面 docker-compose 配置
version: '3'
services:
  echo-mysql-local:
    image: mysql:5.7
    container_name: echo-mysql-local
    ports:
      - 4444:3306
    volumes:
      - ./mysql/data:/var/lib/mysql
      - ./mysql/echo_db_create.sql:/docker-entrypoint-initdb.d/echo_db_create.sql
    environment:
      MYSQL_ROOT_PASSWORD: "echo"
    command: --character-set-server=utf8mb4 --collation-server=utf8mb4_unicode_ci
  echo-meta-server:
    image: registry.cn-beijing.aliyuncs.com/virjar/echo-meta-server:latest
    container_name: echo-meta-server
    ports:
      - 4826:8080
    environment:
      SPRING_DATASOURCE_USERNAME: root
      SPRING_DATASOURCE_PASSWORD: echo
      SPRING_DATASOURCE_URL: jdbc:mysql://echo-mysql-local:3306/echo?useUnicode=true&characterEncoding=utf8&zeroDateTimeBehavior=convertToNull&useSSL=false&autoConnect=true
    depends_on:
      - echo-mysql-local
  echo-fe-ui:
    image: registry.cn-beijing.aliyuncs.com/virjar/echo-fe-ui:20210430
    container_name: echo-fe-ui
    ports:
      - 8999:80
    volumes:
      - ./echo-fe-nginx.conf:/etc/nginx/conf.d/default.conf
    environment:
      API_ENTRY: http://echo-meta-server:8080
    depends_on:
      - echo-meta-server
  echo-nat-server:
    image: registry.cn-beijing.aliyuncs.com/virjar/echo-nat-server:latest
    container_name: echo-nat-server
    ports:
      - 12000-12010:12000-12010
      - 5699:5699
      - 5698:5698
    environment:
      API_ENTRY: http://echo-meta-server:8080
      SERVER_ID: echo-nat-server-001
      MAPPING_SPACE: 12000-12010
    depends_on:
      - echo-meta-server
  echo-http-proxy-server:
    image: registry.cn-beijing.aliyuncs.com/virjar/echo-http-proxy-server:latest
    container_name: echo-http-proxy-server
    ports:
      - 13000-13020:13000-13020
      - 5710:5710
    environment:
      API_ENTRY: http://echo-meta-server:8080/
      MAPPING_SERVER_URL: http://echo-meta-server:8080/echoNatApi/connectionList
      AUTH_CONFIG_URL: http://echo-meta-server:8080/echoNatApi/syncAuthConfig
      SERVER_ID: echo-http-proxy-001
      MAPPING_SPACE: 13000-13020
    depends_on:
      - echo-meta-server
  echo-client:
    image: registry.cn-beijing.aliyuncs.com/virjar/echo-client:latest
    container_name: echo-client
    environment:
      API_ENTRY: http://echo-meta-server:8080/
      ECHO_ACCOUNT: admin
      ECHO_PASSWORD: admin
    depends_on:
      - echo-meta-server
      - echo-http-proxy-server
      - echo-nat-server
docker-compose.yaml
- echo-mysql-local 数据库
- echo-meta-server 原信息服务 + 权限管理
- echo-fe-ui admin Web 管理
- echo-nat-server nat 映射服务,依赖 echo-meta-server
- echo-http-proxy-server http-proxy,依赖 echo-meta-server
- echo-client 代理出口,依赖 echo-meta-server 启动
- docker-compose up;

- 首次启动数据库初始化需要时间,echo-meta-server 启动后可能连接不上数据库,重启一次就好
- 数据库初始化依赖于./mysql/echo_db_create.sql
-
echo-deploy 里面新建 mysql 文件夹,将 echo_db_create.sql 扔进去
-
下载 echo-fe-nginx.conf 扔到 echo-deploy 文件夹
-
docker-compose up -d;
-
访问 http://localhost:8999
Admin 配置
服务都正常启动之后,还需要做一下 NATServer 和 http-proxy server 配置。
注册账号和设置 admin 账号
首先,http://localhost:8999 注册一下账号,本地测试一般直接使用 admin/admin 就算了。
同时设置一下代理账号密码,都设置成 10086/10086 即可。
http://localhost:8999 (二维码自动识别)
注册完成之后,进入 mysql 容器(如果是自己的 MySQL 自行处理),
本地数据库密码默认是 echo ;
将刚刚注册的账号设置成管理员,然后重新登录。
$:docker exec -it echo-mysql-local bash;
root@3c35bcc6c9e8:/# mysql -uroot echo -p
Enter password:
Reading table information for completion of table and column names
You can turn off this feature to get a quicker startup with -A

Welcome to the MySQL monitor.  Commands end with ; or \g.
Your MySQL connection id is 83
Server version: 5.7.34 MySQL Community Server (GPL)

Copyright (c) 2000, 2021, Oracle and/or its affiliates.

Oracle is a registered trademark of Oracle Corporation and/or its
affiliates. Other names may be trademarks of their respective
owners.

Type 'help;' or '\h' for help. Type '\c' to clear the current input statement.

mysql>  update user_info set admin=1 where id =1;
重新登录之后,就能看到 Admin 管理服务资源页面了。

添加 nat-server 和 http-proxy-server
nat-server 地址为: http://主机 IP:5699
http-proxy-server 地址为: http://主机 IP:5710
如下图能显示服务的 SID,则说明添加成功了。

到这里系统已经搭建完成了,接着是最终一步,接入 Android 客户端。
echo-client 接入
- 支持本地主机和 Android 客户端
本地主机接入推荐使用 docker
docker run -e API_ENTRY=http://192.168.31.135:4826/ \
-e CLIENT_ID=local_echo_client_2 \
-e ECHO_ACCOUNT=admin -e ECHO_PASSWORD=admin \
--restart=always --name=local__debug_echo_client_2 \
-d registry.cn-beijing.aliyuncs.com/virjar/echo-client
Android app 在 Admin 页面可以下载到最新 Apk,下载好后自行安装启动。
最后,在“代理”资源页面能看到代理 IP 信息,就说明成功了。
使用
$ export https_proxy=http://10086:[email protected]:13012;curl -vvv https://qq.com

* Uses proxy env variable https_proxy == 'http://10086:[email protected]:13012'
*   Trying 192.168.31.135...
* TCP_NODELAY set
* Connected to 192.168.31.135 (192.168.31.135) port 13012 (#0)
* allocate connect buffer!
* Establish HTTP proxy tunnel to qq.com:443
* Proxy auth using Basic with user '10086'
> CONNECT qq.com:443 HTTP/1.1
> Host: qq.com:443
> Proxy-Authorization: Basic MTAwODY6MTAwODY=
> User-Agent: curl/7.64.1
> Proxy-Connection: Keep-Alive
>
< HTTP/1.1 200 Connection established
< Connection: keep-alive
< Via: 1.1 echo-proxy
<
* Proxy replied 200 to CONNECT request
* CONNECT phase completed!
* ALPN, offering h2
* ALPN, offering http/1.1
* successfully set certificate verify locations:
*   CAfile: /etc/ssl/cert.pem
  CApath: none
* TLSv1.2 (OUT), TLS handshake, Client hello (1):
* CONNECT phase completed!
* CONNECT phase completed!
* TLSv1.2 (IN), TLS handshake, Server hello (2):
* TLSv1.2 (IN), TLS handshake, Certificate (11):
* TLSv1.2 (IN), TLS handshake, Server key exchange (12):
* TLSv1.2 (IN), TLS handshake, Server finished (14):
* TLSv1.2 (OUT), TLS handshake, Client key exchange (16):
* TLSv1.2 (OUT), TLS change cipher, Change cipher spec (1):
* TLSv1.2 (OUT), TLS handshake, Finished (20):
* TLSv1.2 (IN), TLS change cipher, Change cipher spec (1):
* TLSv1.2 (IN), TLS handshake, Finished (20):
* SSL connection using TLSv1.2 / ECDHE-RSA-AES128-GCM-SHA256
* ALPN, server accepted to use h2
* Server certificate:
*  subject: C=CN; ST=Guangdong Province; L=Shenzhen; O=Shenzhen Tencent Computer Systems Company Limited; OU=R&D; CN=www.qq.com
*  start date: Jun 22 00:00:00 2020 GMT
*  expire date: Sep 22 12:00:00 2021 GMT
*  subjectAltName: host "qq.com" matched cert's "qq.com"
*  issuer: C=US; O=DigiCert Inc; OU=www.digicert.com; CN=Secure Site CA G2
*  SSL certificate verify ok.
* Using HTTP2, server supports multi-use
* Connection state changed (HTTP/2 confirmed)
* Copying HTTP/2 data in stream buffer to connection buffer after upgrade: len=0
* Using Stream ID: 1 (easy handle 0x7f84b8808200)
> GET / HTTP/2
> Host: qq.com
> User-Agent: curl/7.64.1
> Accept: */*
>
* Connection state changed (MAX_CONCURRENT_STREAMS == 128)!
< HTTP/2 302
< date: Thu, 20 May 2021 16:13:44 GMT
< content-type: text/html
< content-length: 161
< server: squid/3.5.24
< location: https://www.qq.com/
<
<html>
<head><title>302 Found</title></head>
<body bgcolor="white">
<center><h1>302 Found</h1></center>
<hr><center>squid/3.5.24</center>
</body>
</html>
* Connection #0 to host 192.168.31.135 left intact
* Closing connection 0
完美!
撒花!!!
最后。
欢迎 Start 。
欢迎试用。
https://github.com/virjar/echo
社区
加 V:( virjar1 ),备注 echo 入群
最后。
不要玩火哈。
毕竟。
爬虫写得好,牢饭吃得早。
手动狗头。